
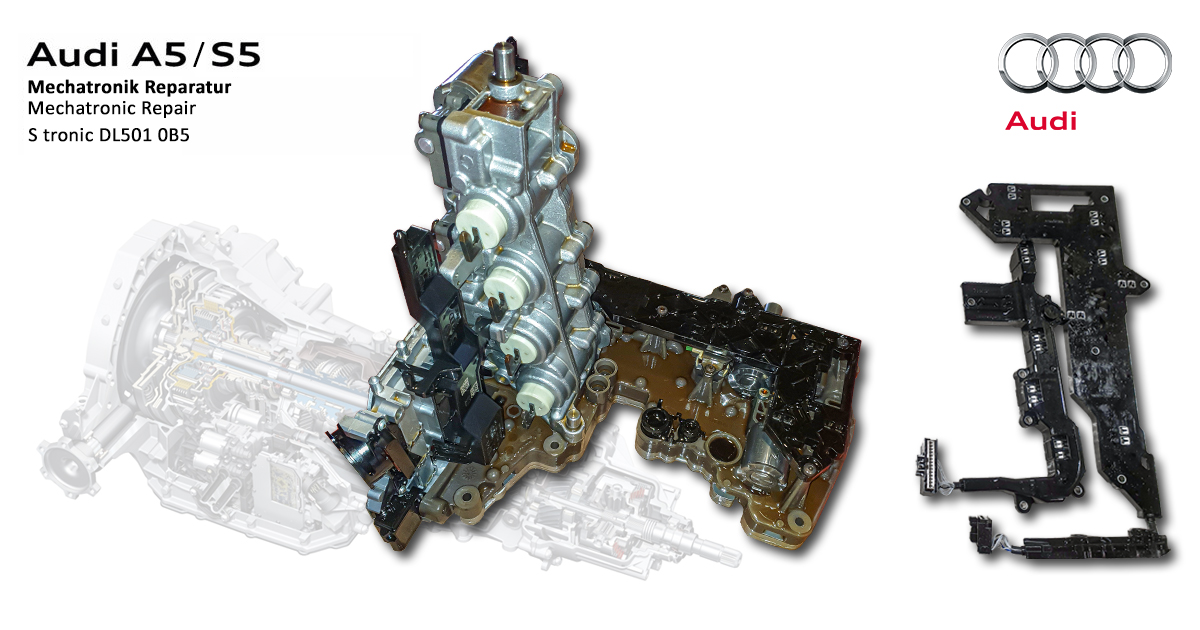
The Mechatronic unit is the achilles heel of the Audi 0B5 DL501 7 speed S tronic gearbox.
Unfortunately, if you're reading this you're likely one of the many owners, myself included, who've experienced Mechatronic unit problems.
Having a faulty Mechatronic unit repaired can cost thousands, and you'd need a small mortgage to have it replaced...
Don't start hyperventilating into a brown paper bag just yet!
Keep reading to find out how to repair your Mechatronic unit for under £700!
P.S. I have secured readers of my blog a cheeky discount too!
This post may contain affiliate links. Please read my disclosure for more info.
Contents
Before you get stuck into this article, I highly recommended reading my complete guide to the S tronic gearbox first.
It'll get you up to speed with how the gearbox works and much more!
- 1.0 - What Does The S tronic Mechatronic Unit Do?
- 2.0 - Faulty S tronic Mechatronic Unit Problems / Symptoms
- 3.0 - S tronic Mechatronic Unit Fault Codes
- 4.0 - Mechatronic Unit Repair and Replacement Cost
- 5.0 - DIY Mechatronic Unit Repair Kit Installation Guide
If you find this article useful, it'd be amazing if you could help me spread the word by sharing it on social media or your favourite forum, thanks!
1.0 - What Does The S tronic Mechatronic Unit Do?
Zooming out for a second before we get into the detail, let's just take a look at what the Mechatronic unit actually does.
Quoting SSP 429:
"The mechatronic system controls, regulates and performs the following functions:
- Adaptation of oil pressure in the hydraulic system to requirements
- Dual clutch regulation
- Clutch cooling regulation
- Shift point selection
- Gearbox control and regulation
- Communication with other control units
- Limp-home programs
- Self-diagnostics"
Pretty important then!
2.0 - Faulty Audi S tronic Mechatronic Unit Problems / Symptoms
Symptoms of a faulty or failed S tronic Mechatronic unit can be poor gear selection or even no gear selection at all.
Note: Inconsistent or harsh gear changes could be a sign of MAP sensor failure, check out my complete guide to replacing your MAP sensor for more info!
3.0 - S tronic Mechatronic Unit Fault Codes
Note: In this section I reference the hollow and solid shaft, if you don't have a clue what I'm on about, have a quick read of my article on how the S tronic gearbox works to find out more.
According to the Audi Technical Service Bulletin SB-10054213-2278 if you get the following message appear in the information display:
“Gearbox malfunction: you can continue driving”

The following fault codes may have been recorded and could point to a faulty Mechatronic unit.
If you need a device to read the fault codes, I'd highly recommend OBDEleven.
- DTC P17D8 (Torque limitation because of clutch temperature) with symptom code 8040
- DTC P0726 (RPM signal of engine control unit, implausible signal) with symptom code 7980
- DTC P174B (Valve 4 in the sub-gearbox 1, electric fault) with symptom code 8027
- DTC P174F (Valve 4 in the sub-gearbox 2, electric fault) with symptom code 8028
- DTC P179C (Main pressure valve, electric fault) with symptom code 8029
- DTC P179D (Coolant oil valve electrical fault) with symptom code 8030
- DTC P174C (Partial transmission 1 valve 2 Electrical error ) with symptom code 8026
- DTC P174A (Valve 3 in the sub-gearbox 1, electric fault) with symptom code 8939
- DTC P174E (Valve 3 in the sub-gearbox 2, electric fault) with symptom code 8940
- DTC P1740 (Clutch temperature monitoring) with symptom code 8031
As well as the error message above, there are two others you may experience:
"Gearbox fault: You can continue driving to a limited extent only"

If the above message shows, protective functions are activated to minimise or prevent damage occurring, but result in a loss of performance.
Only the gears on the hollow shaft can be engaged (even-numbered gears 2, 4, 6 and R).
"Gearbox fault: You can continue driving to a limited extent only No reverse gear"

If the above message shows, protective functions are activated to minimise or prevent damage occurring, but result in a loss of performance and with no ability to select Reverse gear.
Only the gears on the solid shaft can be engaged (odd-numbered gears 1, 3, 5 and 7).
4.0 - Audi S tronic Mechatronic Unit Repair and Replacement Cost
The cheapest way to repair your Mechatronic unit is to do it yourself following my guide below.
However, if you'd rather not mess around with swapping circuit boards, but don't mind removing / refitting the Mechatronic unit and doing the S tronic service, you have these two options:
- Ecutesting.com Repair Service - £400+VAT +£15 Shipping
- Gearbox Nottingham Replacement Mechatronic Unit - £850-£1300+VAT
*All prices correct as of 26/11/2020. I've not used any of the above companies, nor am I sponsored or paid to endorse them. Please only part with your hard earned money when you are happy the company will provide the service you expect.
Be mindful the prices above don't include all the parts required to do the S tronic service nor the replacement parts you'll need as a result of removing the Mechatronic unit (seals, ATF fluid, filters etc).
You'll likely need to add at least £350-£400 on top of those prices.
If you want the whole job doing for you, you're looking at £2300+ (based on a figure taken from AC's quote on rmsmotoring)
5.0 - DIY Mechatronic Unit Repair Kit Installation Guide
5.1 - Parts Required
The following parts and part numbers were correct for my 2010 S5 Sportback, please double check with Audi that these parts are correct for your specific car (I'm pretty sure they will be, but better safe than sorry!)
I went belt and braces on this job, you might decide you can get away without replacing a few of the bits below, but I wasn't taking any risks of ruining my ££££ gearbox.
- N 013 827 5 - Sump drain plug washer x1
- 0B5 325 330 A - Exchangeable external ATF filter x1
- WHT 005 499 A - O-ring for external ATF filter x1
- WHT 003 487 - New replacement sump drain plug x1
- G 052 529 A2 - ATF gearbox oil 7L
- N 911 511 01 - Subframe cross brace bolts x6
- N 910 968 01 - Oil pan bolts x15
- 0B5 321 371 E - Oil pan gasket x1
- 0B5 325 429 E - Internal filter / strainer with O-rings x1
- WHT 005 379 - Oil seal between external filter housing and gearbox x1
- 0B5 321 473 - ATF pipes inc seals between external filter housing & gearbox x2
- N 906 660 03 - O-ring for metal pipes going into external filter housing x2
- N 104 057 02 - Mechatronic unit mounting bolts x6
- 0B5 315 105 TC - Mechatronic clutch pressure pipes x1
- 0B5 315 105 TA - Mechatronic internal ATF pipes x1
- 0B5 398 009 F - Mechatronic PCB repair kit x1
The RRP of all these parts from Audi is £643.98 (2019 price), I was able to get them at a slight discount from Crewe Audi for £592 delivered.
For an up-to-date discounted price, contact Tom Fox @ Crewe Audi and mention you found his info on AndyBuck's S5 Build Blog.
5.2 - Tools Required
- VCDS or OBDEleven, to read the live transmission fluid temperature
- Low Range Torque Wrench, with 3Nm setting
- I used a Norbar 15008 Professional, which was perfect for the job but appears to be unavailable now, this Wera Click Torque A5 should do the trick though!
- Anti Static Wrist Band
- Screwdriver and Torx Bit Set, for the undertrays
- I love my DeWALT bit set, if you've read any of my other articles you'll know how much I go on about it
- Flat head screwdriver with a 3,5mm wide tip
- for releasing the Mechatronic unit printed circuit board wiring clips
- HW10 10mm Hex Socket
- 13mm Spanner
- Vernier Calipers for setting the gear actuator position
- VAG 1924 ATF Filling Unit (Optional)
- basically you need a method of refilling the gearbox with ATF fluid
- Oil Drain Pan
- Gloves
- I really rate Black Mamba, been using them a number of years now
- Safety Goggles
- for once I was glad I wear glasses, some ATF fluid dripped directly on to my lenses, which would have gone right in my eye...
Again, I went belt and braces on this job, you may consider the anti static wrist band unnecessary (it's quite awkward to work with it on too).
5.3 - Step by Step How-to Guide
Disclaimer: Any information given in this guide is to be used at the readers own risk. I take no responsibility for injuries to the reader or damage to their vehicles. If this guide is followed correctly, no harm should occur to either the reader or the car.
Please read through the entirety of this guide prior to undertaking any work, and take due care.
All the images in this guide are of my B8 2010 Audi S5 Sportback, the process will be similar if not identical on the S5 Coupe, S4 and pretty much any of the vehicles the 0B5 DL501 S tronic gearbox is fitted to.
You should budget a whole day to complete this job. It took me 9 hours to complete as I was taking my time and learning / documenting as I went along. An experienced DIY'er who's done this before could probably do the job in 4-5hours.
Without further ado, let's get into it!
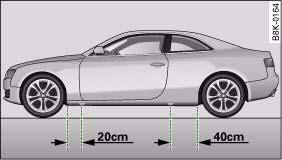
Step 1 - Jack Your Vehicle Up Level
This is super important, the car needs to be level to ensure the gearbox drains correctly, and to ensure the right amount of gearbox oil is added.You also need the car to be high enough off the floor to allow the Mechatronic unit to drop down from the gearbox and be removed. I'd recommend at least 500mm between the sump pan of the gearbox and the floor.
Most of us home mechanics aren't fortunate enough, but if you do have a car lift or a pit, this would be ideal.
I drove my car onto my home made ramps, then jacked the rear end up and stuck an equal amount of blocks under the rear wheels as the front.

Ideally, you should have the car sat on axle stands at all four corners, positioned where indicated in the diagram below showing the safe B8 / B8.5 Audi A5 / S5 jacking points.
Step 2 - Remove the Undertrays
Using your screwdriver and torx bits, remove the highlighted undertrays to reveal the engine and transmission.
Step 3 - Remove the Subframe Cross Brace
Caution
Risk of damage to running gear components.
Never place the vehicle on its wheels if the subframe, steering rack or subframe cross brace is not correctly installed!
The vehicle must not be supported on the subframe or the subframe cross brace (e.g. using a trolley jack or similar)!
Now, despite the above warning in the Audi workshop manual, I sat my car on the wheels with the subframe cross brace removed throughout the Mechatronic repair process.
I have yet to notice any ill effects of doing so but that doesn't mean something bad wouldn't happen if I did it again. Please be aware of the risk and move forward with removing the brace if you are happy to do so.
Using your socket and wrench, remove the 6 bolts securing the cross brace.
If I recall correctly, in addition to the 6 bolts, one of the heatshields was attached to it on the right-hand side and the power steering pipes on the left-hand side (don't quote me on that though).
Just double check everything is clear before you lower the brace away from the vehicle.

Step 4 - Loosen the Gearbox Fill Plug
Before you start draining any fluid, make sure you can loosen and remove the gearbox fill plug. It'll be a bad day if you can't and have already drained the fluid...Make sure your 10mm hex socket is fully engaged in the plug too, I slipped and slightly rounded mine on first try, and that was me being careful too (I replaced it as part of the service).


Step 5 - Check Your Refill Method Works
Again, before draining any fluid, make sure your selected method of refilling the gearbox fluid is going to be suitable.You won't have room to poor ATF fluid into the gearbox straight from the bottle, so you either need to run a tube down through the engine bay, or use a pump from below.
I ran a length of copper tube, topped with a funnel, down from the left-hand side of the engine bay to the gearbox fill hole.


Step 6 - Drain the Transmission ATF Fluid
Using your HW10 socket, undo and remove the fill plug (if you haven't already), careful as a little fluid comes out when you remove it. Have your oil pan in position ready.Then, remove drain plug and catch the remaining fluid.
I drained 5 litres of oil and this is what it looked like. According to the service history, it had been replaced at 39840 miles, when I carried out this work the car was at 80,010 miles (4 years later).

Step 7 - Remove the Gearbox Sump Pan
Allow the gearbox to drain fully until it's just dripping, then use a Torx bit to undo the 15 sump pan fixing bolts.
Leave 1 bolt screwed in a couple of turns whilst you are removing the others so it doesn't fall on you (like it does in the Deutsche Auto Parts video later).

There is quite a lot of ATF fluid on the sump pan, so be in a position to remove the pan and immediately tip it towards your oil drain pan.

The internal ATF intake filter may fall out when you lower the sump pan too, that thing holds a surprising amount of fluid. Fortunately, mine stayed in place but just be mindful it could happen.
Step 8 - Remove the ATF Intake Filter
The ATF intake filter is only held in position by it's seal, just pull the filter slightly downward and toward the rear of the car.It should pop off the seal and come away quite easily. Mine came off so easily, it shot across the garage floor spilling oil everywhere...
Again, watch out, it holds quite a lot of oil.


Here's what the gearbox should look like with the ATF filter removed.

Step 9 - Remove the Used Sump Pan Gasket
Take the gearbox sump pan to your workbench and remove the used gasket. Mine was pretty solidly stuck to the pan, but fortunately came off in one piece.
Step 10 - Clean the Sump Pan and Fit the New Gasket
Before you wipe away any old fluid inspect the magnets for any metal shavings, mine were completely clear (phew!)Using a clean rag remove all the fluid from the sump pan then fit the new gasket.


Remove the plastic clips (labelled 3 below) if present.

Once my sump pan was cleaned up, I noticed the internal ATF filter had been chattering against the pan and had worn away the paint.

Step 11 - Remove the External ATF Fluid Filter
There are two types of external ATF filters fitted to the S tronic gearbox.
Mines the one on the bottom right, so I'll be using that for the rest of this guide.
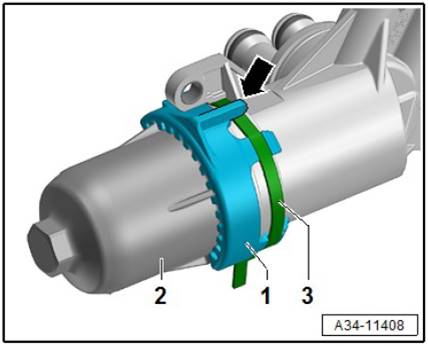
If fitted, remove the retaining strap (labelled 3 below) and the locator (labelled 1 below). Neither were fitted on my car, so were either removed at the factory or at the first service.
Have your oil drain pan at the ready for this bit, to catch any remaining fluid. Unscrew the filter cap either by hand or using socket/spanner on the end (be careful though as it's only plastic).

Mine looked liked it'd come to the end of it's life for sure...

Step 12 - Unplug and Remove the Gearbox Electrical Connector
Quick reminder to ensure the car is in Park (P), switch off the ignition, remove the key and place out of range.
Rotate the harness fastener anti-clockwise about 90°. I found this really tricky, mine didn't want to budge.


This next part of the step is very important!
I read a forum post by a guy who missed this step causing him to tear the ribbon cable on the inside of the gearbox when removing the Mechatronics unit. Definitely not a good move.
Remove the fixing in the threaded connector housing using a Torx bit, then twist it anti-clockwise 90° and remove it.


Here you can see mine with the fixing removed and rotated anti-clockwise 90°.

And finally, fully removed.

Step 13 - Remove ATF Filter Fixings
Using a Torx bit, remove all three ATF filter fixings.
Step 14 - Space Out ATF Filter
I'll be the first to admit my solution isn't the most elegant for this step. According to the Audi workshop guide, you are supposed to remove the ATF filter completely at this point.I don't know if I was being daft here or what...
But I couldn't get enough movement on the ATF filter housing to remove it from the metal pipes, because of the two plastic pipes (labelled 2 below) inside the filter that go through the gearbox housing and join to the Mechatronic unit.

Instead, I used a bit of wood to space the filter just far enough off the gearbox to allow the Mechatronic unit to be lowered, but not too far as to damage the pipes.

Step 15 - Disconnect Internal Mechantronic Wiring Harness
Caution
The gearbox control unit (mechatronic unit) can be irreparably damaged by electrostatic discharge.
Before handling electrical connectors, mechanic must discharge static. To do so, touch vehicle earth, heater radiator, or lifting platform, with your hand.
Do not touch contact pins in gearbox connector with bare hands.
This is the first step where I used my Anti Static Wrist Band, clipping it to one of the parts listed in the above Caution message.
To remove the wiring connector, pull the red retaining clip down, then depress the release catch (labelled 2 below) and pull the connector out carefully.


Step 16 - Remove the Mechatronic Unit
You're now ready to drop the Mechatronic unit from the gearbox.Double check you've done all of the previous steps and have read through all of this step prior to lowering your Mechatronic unit out.
Make sure you've got something ready to sit the Mechatronic unit onto, I used a clean bit of cardboard in an effort to try and soak up some of the ATF fluid.
My Mechatronic unit had a surprising amount of ATF fluid still sitting on the upper surfaces, enough to warrant pooring it into my drain pan.
Right, bare with me here, there are a lot of Cautions and Notes in the Audi instructions.
Caution
Risk of damage to mechatronic unit.
Loosen only the bolts marked - 6 ... 1 -
If other bolts are loosened, this may affect the operation of the mechatronic unit or the mechatronic unit could come apart.
Fortunately, the bolts you need to loosen are a different size to those that you need to leave well alone, slightly smaller if I recall correctly.

Note
Ensure that the sealing surface is not damaged.
The mechatronic unit may be tightly seated.
If it is necessary to lever off the mechatronic unit, get help from a second person to ensure that the mechatronic unit does not drop out.
Alternatively, screw bolts -1- and -2- in again slightly to catch mechatronic unit when levering it out.
I'd second the note above regarding having a second person on hand to help with this stage.
The Mechatronic unit is an awkward thing to handle, it's quite tall, heavy and slippy when covered in ATF fluid. Depending on how far off the floor your car is, there may not be enough room to lay directly beneath the Mechatronic unit and still have enough depth to fully remove it from the car.
As a result, you'll need to be off to one side instead. It'd be incredibly difficult to manouver the Mech unit out and down safely on your own like that.
I also highly recommend leaving two bolts in as mentioned above.
My Mechatronic unit didn't immediately fall out when the last screw was loosened, I had to prise it free by hand.
However, when the seal released it dropped suddenly onto the bolts.
Caution
Risk of damage to senders on rear side of mechatronic unit.
When setting down the mechatronic unit, the side with the bolt heads must be facing downwards.
Give the Mechatronic unit another once over (can't be too careful), make sure everything is clear and nothing is obstructing its removal.
Once you're happy, lower the Mechatronic unit down and set it to one side for now.

Step 17 - Remove the ATF Pipes
There are two sets of ATF pipes, in older cars (like mine) there will be 2x metal clutch pressure pipes clipped together (labelled -1- and -2- below) and 3x shorter plastic pipes joined together (labelled -3 ... 5- below). On newer cars the two metal pipes will be plastic.Regardless of whether you have a newer or older gearbox, you should replacing the old pipes for new plastic ones.

Note: 2 of the 3 plastic pipes came out still attached to my Mechatronic unit and 1 was left in the gearbox, i.e. the part snapped. Make sure you have replacement pipes.

To remove the set of 3 plastic pipes. Simply pull them out, they are only retained by their rubber o-rings.
Removing the metal pipes is slightly different. First you need to remove the bolt (highlighted by the arrow below) holding the retaining clip, then they just pull out.
Note: If you have bought replacement plastic pipes (0B5 315 105 TC), you can discard the metal pipes and retaining clip.
You must retain the bolt that secured the retaining clip though.
I recommend refitting the bolt immediately after removing the pipes so you don't lose it, torque it to 10Nm.
Step 18 - Drain Oil From Non Return Value
This is optional and not in the Audi instructions, but in my opinion the more old fluid you can remove the better.Position your oil drain pan beneath the white non return valve in the centre of the gearbox, make sure you're out the way, then gently press the ball bearing in the middle and it'll release a load more ATF fluid.

Step 19 - Remove External ATF Filter
Oddly, the Audi instructions miss this step out.Remove the spacer you put in earlier, then you'll need your 13mm spanner to undo the bolt (labelled 4 below) next to the two pipes going into the top of the external ATF filter.
It's quite awkward to access the bolt if I remember rightly.

Next, remove the two plastic pipes inside the ATF filter. You should be able to pull them out from inside the gearbox now the Mechatronic unit has been removed.
Finally, pull the filter housing off the two metal pipes.

Step 20 - Remove the Mechatronic Unit Printed Circuit Boards
That's it in terms of disassembly of the gearbox, you can now concentrate on the Mechatronic unit repair.Again, the Audi instructions have a number of Caution notes, understandable really as this part could cause irrepairable damage to your Mechatronic unit. Be careful!
Caution
The gearbox control unit (mechatronic unit) can be irreparably damaged by electrostatic discharge and if unsuitable tools are used.
Before handling electrical connectors, mechanic must discharge static. To do so, touch vehicle earth, heater radiator, or lifting platform, with your hand.
The mechatronic unit must be renewed if the catch on the mechatronic unit is damaged when releasing and unplugging the electrical connectors.
To release, use a screwdriver with maximum blade width -a- = 3,5mm.
Risk of loose contacts.
The contact springs on the printed circuit are only designed to be plugged in once. A printed circuit must not be used again after it has been unplugged.

Having grounded yourself and/or whilst wearing your anti static wrist band, use your 3,5mm flat head screw driver to release both the printed circuit board wiring connectors.
Insert the flat head into the connector as shown below, using it to press in direction A whilst gently pulling the connector in direction B.

After removing the wiring connectors, unscrew bolts -1, 2 and 3- about 5mm on the smaller up-right circuit board (this is to prevent it falling off during the next step). Remove bolts -4- and -5- completely.

Carefully pull circuit board A off the contact tabs on the valves. Once free of the tabs, remove bolts -1, 2 and 3- completely and set the circuit board aside.

This is what your Mechatronic unit should look like with circuit board A removed.

Now let's remove circuit board B. Similarly, unscrew bolts -1 ... 5- about 5mm.
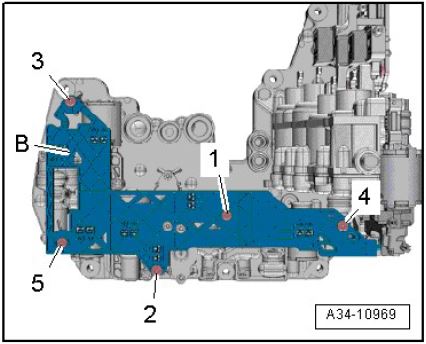
Pull the circuit board upwards off the valve contact tabs, then fully remove bolts -1 ... 5-.

Here's what mine looked like with circuit board B removed.

Step 21 - Replace the Swarf Protectors
Note
Install swarf protectors even if none was previously fitted in gearbox.
Unfortunately, the instructions I had for this part were for an older version of the Mechatronic repair kit, I had the latest version 0B5 398 009 F.
The instructions showed 4x rectangle and 2x cross shaped swarf protectors. I had 2x large protectors (not present in the instructions at all), 2x rectangular and 6x cross shaped protectors.

Nevertheless, through a process of elimination, I worked out where they should all go.
I'm afraid I didn't get a photo of mine all installed before I fitted the new circuit boards (my hands were covered in ATF fluid).
Starting with the 2x larger protectors, which fit nicely on the larger two valves (replacing two rectangular protectors in my case).


Then I fitted the two cross shaped protectors as per the instructions (swapping like for like in my case).


Next I replaced the two remaining rectangular protectors (like for like) with the two new rectangular protectors.

That left me with 4x cross shaped protectors, which I assumed could only be for the four valves on the up-right portion of the Mechatronic unit (which, in my case, previously had no protectors fitted).

Step 22 - Install New Printed Circuit Boards
Ok, now it's time to fit the new circuit boards.Caution
The contact springs on the printed circuit are only designed to be plugged in once. A printed circuit must not be used again after it has been unplugged.
Starting with the larger circuit board B, rest the board in place on the Mechatronic unit.
Screw in bolts -1 ... 5- about 2 turns, the bolts are used as a guide to ensure the circuit board is aligned correctly and slots in perfectly.
Once in position with the bolts in place as a guide, carefully press the circuit board down onto the contacts.
Screw in bolts -1 ... 5- by hand until they make contact, then tighten to 3Nm using your low range torque wrench in sequence -1 ... 5-.
Moving now to circuit board A, place it roughly in position then screw in bolts -1 ... 3- about 2 turns. Again, using the bolts as guide pins when pressing in the new circuit board.
Once in position, carefully press the circuit board into the contacts.
Slide the wiring connectors from circuit board A and B over the threaded bosses where bolts -4- and -5- will go.

Screw in all 5 bolts by hand until they make contact, then torque them to 3Nm in sequence -1 ... 5-.
Plug in the electrical connectors, they should audibly click into place.
That's the repair side of things done, it's now time to reassemble everything!
Step 23 - Fit New ATF Pipes
Starting with the clutch pressure pipes (0B5 315 105 TC).Irrespective of whether your car was fitted with metal or plastic pipes, Audi dictates renewing this part.
The new style plastic pipes are moulded together and have a bracket that clips to the gearbox housing to ensure they are in position. Smear some ATF fluid on the new seals and simply push them into the gearbox housing.
Note: Do not refit the metal bracket if your gearbox originally had metal pipes, it won't fit and isn't required. You must however, refit the bolt that secured the metal bracket (as per Step 17 above).
Here's my new plastic pipes fitted, I've labelled the bracket that clips to the gearbox housing rib.

Moving now to the three plastic ATF pipes in the middle (0B5 315 105 TA), these should also be renewed.
Again, they simply push into place in the gearbox housing and you should wipe a smear of ATF fluid on the new seals.
Your gearbox should look like this when both sets of pipes are installed.

Step 24 - Set Position of Selector Forks
All the gear selector forks need to be set in the neutral position. The only way to check that is to reset them.First, get a feel for the movement of the selectors. They each have three positions:
- Gear engaged -G-
- Neutral -N- (centre positon)
- Gear engaged - G-
I found the movements very subtle and difficult to discern. I ended up moving the selectors several times to get used to it.

Once you've checked the movement of each selector fork, follow these steps to set their final position.
(Copied verbatim from the Audi instructions) - Move the 4 selector forks once into each position -arrows-, one after the other.
Then shift all selector forks back into »centre position«-N-.
Step 25 - Set Position of Gear Actuator Coupling Lugs
Caution
The gearbox control unit (mechatronic unit) can be irreparably damaged by electrostatic discharge.
Before handling electrical connectors, mechanic must discharge static. To do so, touch an earthed metal object, such as a heater radiator or lifting platform, with your hand.
Do not touch contact pins in gearbox connector with bare hands.
Do not apply any pressure to the sensors when levering out the plungers.
In this step you will set the position of the gear actuators.
There are two different settings, depending on the build date identification number on your Mechatronic unit.
Find and note down the identification number on the underside of your Mechatronic unit.

Here's mine for example:

The table below shows what each part of the identification number means.

- Mechatronic units with identification up to “L31B1137”: Dimension -a- = 28 mm
- Mechatronic units with identification from “L31B1138” onwards: Dimension -a- = 32 mm
Using my production date identification number, L30M1078, as an example.
You can determine that my Mechatronics unit was the 78th unit produced on the first shift on the Friday in week 30 of 2010, meaning I should set my actuators to 28mm.
To set the actuators, gently pull them out or push them in until dimension -a- matches the correct offset for your build date, checking them with your vernier calipers.

Be careful, ATF fluid squirted out when I moved mine, I can't recall from where but just move them slowly. I also found that moving one would disrupt the one next to it, so double check them all before reassembly.
Due to being lay on his back in low light conditions, my Dad misread the identification number, and we ended up setting my actuators to 32mm instead of 28mm.
I can confirm the Mechatronics unit absolutely will not go in if the actuators aren't set correctly...
Step 26 - Re-install Mechatronic Unit into S tronic Gearbox Housing
Carefully move your repaired Mechatronic unit back underneath your car ready to re-install.Again, this step is far easier with someone helping.
Lift the Mechatronic unit up and into the gearbox housing, it should go back in without any resistance. The location pins should go straight into the holes in the gearbox and the gear actuator coupling lugs should engage with the selector forks easily too.
If the Mechatronic unit won't go in easily, it'll be your actuators or selector forks in the wrong position. It took me three goes to get it right.
Once in position, have your helper hold the unit in place while you check that all four actuator coupling lugs are engaged in the selector forks.

I found this super tricky to see, you have to move your head to different positions to see each one. You need to be absolutely sure they are all in though.
Once satisfied, screw in bolts -1 ... 6- (these should be new bolts, N 104 057 02, discard your old ones) and torque them in sequence -1 ... 6- to 10Nm.
Step 27 - Re-connect Mechatronic Unit Wiring Connector
Re-connect the Mechatronic unit wiring connector, make sure it's properly engaged.
Step 28 - Install New Internal ATF Intake Filter
If you've ordered one, install your new ATF intake filter (or your old one if you didn't choose to replace it).Make sure you remember to fit the o-ring (labelled -2- below).

When inserting the ATF intake filter neck into the oil pump it should come to a hard stop, add a little ATF fluid to the seal if you've got a new filter.
Step 29 - Re-install Oil Pan
Audi suggests replacing all the oil pan bolts (N 910 968 01).Offer up your gearbox oil pan to the gearbox, double check you've completed all the previous steps and that you have your new gasket installed.
Screw in bolts -3- and -11- hand tight so that they take the weight of the oil pan, then hand screw in the remaining bolts.
Torque the bolts in stages to 10Nm diagonally, starting with -3- and -11-, then -4- and -12- etc.
Step 30 - Re-install External ATF Filter
Caution
Risk of damage to gearbox
The new exchangeable ATF filter must not come into contact with water. Even small amounts of water, such as drips from the engine compartment or wet hands will cause the surface of the exchangeable ATF filter to swell. Small particles of paper can then separate from the surface of the filter and contaminate the mechatronic unit.
Insert two new ATF pipes (0B5 321 473) into the external ATF filter housing, smearing some ATF fluid on all o-rings, labelled -3- and -4- below.
Grab your new ATF filter, smear a bit of ATF fluid on the o-ring, labelled -2- below, and insert it into the filter housing.

Smear some ATF fluid on the filter cap o-ring, labelled -2- below, before screwing the cap onto the housing, just tighten it enough so it doesn't fall off for now.

Install new o-rings (N 906 660 03), labelled -7- below, on the metal ATF pipes.
Smear some ATF fluid on the metal pipe o-rings, then push the ATF filter onto the metal pipes, making sure the two inner plastic ATF pipes go into the hole in the gearbox housing and engage in the Mechatronic unit.
Tighten the bolt labelled -4- below.

Screw in the three fixings that hold the ATF filter to the gearbox housing, torque to 10Nm.
Lastly, torque the ATF filter cap to 8Nm.
Step 31 - Re-install Gearbox Electrical Connector
Put the threaded connector housing back into the gearbox, fixing tab pointing to 9 o'clock, then twist clockwise 90° until the hole in the fixing tab aligns with the threaded fixing hole.Install the bolt, labelled -1- below, and torque it to 8Nm.
Reconnect the gearbox wiring harness, push it into place with the harness fastener pointing to 9 o'clock, then twist clockwise 90°.
When installed correctly, it should look like this.

Step 32 - Install New Oil Pan Drain Plug
Screw in your new oil pan drain plug (WHT 003 487) with a new washer (N 013 827 5), torque to 45Nm.
Deutsche Auto Parts S tronic Oil Service video
I'd highly recommend watching the Deutsche Auto Parts S tronic Oil Service video below before following the next few steps, he explains the service part of the process quite clearly.Step 33 - Fill Gearbox with ATF Fluid
Note
Vehicle must be absolutely horizontal.
With the engine off, do a cold fill with ATF fluid (G 052 529 A2).
Make absolutely sure you have the right fluid, it should be green and have a distinct smell.


Depending on your fill method, it might be best to have someone to help you at this stage.
In my case, my Dad poured the ATF fluid into the funnel in the engine bay, whilst I was under the car watching the fill plug for the fluid to start trickling out.
When you see a small, steady amount of fluid coming out the fill plug hole, insert the fill plug and tighten.
I was able to refill 5 litres of ATF fluid cold, as a rough guide.
Step 34 - Start Car, Plug in and Connect OBDeleven
Plug in the bluetooth OBDeleven device, grab your keys and start the engine, making sure the gear selector is in Park (P).
Open the OBDeleven app on your phone and connect to your device.
Tap the three lines in the bottom right -> select the Transmission module 02 -> Live data -> then search for "tem" and select "Transmission fluid temperature".
Step 35 - Run Through Gears and Top Up ATF Fluid
Note
The ATF level will vary according to the ATF temperature.
If the ATF level is checked when the ATF temperature is too low, this will result in overfilling.
If the ATF level is checked when the ATF temperature is too high, this will result in underfilling.
Both overfilling and underfilling will impair the function of the gearbox.
Air conditioner and heating system switched off.
With the engine at idle speed, keep the brake pedal depressed then cycle through all gear positions, (P) -> (R) -> (N) -> (D) -> (S or D/S) one after another.
Maintain each gear position for at least 2 seconds (I stayed in each gear for 20 seconds, and ended up cycling through the gears several times waiting for the ATF to get to temperature).
Shift back to (N) then to (P), allow the engine to idle to bring up the ATF temperature.
Monitor the OBDeleven app, when the ATF temperature hits 30°C, unscrew the ATF fluid fill plug.
If the ATF fluid level is correct a small amount of fluid will drain out. If not, you need to add more until it does (I had to add a further 1 litre on top of the 5 I added cold).
You need to move quickly during this stage, you need to have filled the transmission correctly before the temperature reaches 50°C.
The air temperature when I did this repair was 10°C, it took ages to get to 30° but after that it rose quickly.
I'd estimate the temperature went slightly over 50°C as I finished filling. After tightening the fill plug and crawling out from under the car, I checked the temp and it was at 66°C.
Step 36 - Reinstall Subframe Cross Brace
Audi dictates always replacing the subframe cross brace bolts (N 911 511 01).Torque them to 90Nm + 135°.
Step 37 - Reinstall Undertrays
Penultimate step! Reinstall your undertrays, make sure you haven't lost any of the fixings. The previous owners of my cars all seem to lose one or two...
Step 38 - Jack Down Car and Test Drive
Breathe a sigh of relief, you're finally done. Jack the car down and go for a test drive!I'll close the guide with a rather satisfying image of all the parts I replaced neatly laid out.

Conclusion
Hopefully you now have a good idea of what to expect if you're going to carry out a DIY S tronic Mechatronics unit repair. If you still have some unanswered questions put them in the comments below!
Make sure to check out my complete guide to the S tronic gearbox if you want to know more about how it works and how it can be modified to add launch control etc.
I really hope you enjoyed this article and found it useful, if you did, I'd really appreciate it if you'd share it on social media or your favourite forum, it'd really help me out and enable me to create more how-to guides like this.
Be sure to Like, Subscribe and Follow me on your favourite social media platforms at the following links: Facebook, Instagram and YouTube, search andybuck123.
Stay tuned for plenty more content to come!
31 Comments
Thanks for taking the time to make this! It super detailed and awesome.
ReplyDeleteThanks Josh! Really appreciate you taking the time to leave a nice comment, glad you liked it :)
DeleteThanks for the excellent guide!
ReplyDeleteOne question though,
The car should be in Park before starting anything, but in the repair process, the gear levers are set into Neutrual. Won't this conflict with the gear lever in the car being set to Park?
Thanks for the great feedback, and superb username :D
DeleteReally good question, the short answer is no it doesn't.
That's based on my experience (it didn't cause any conflict when I did the repair) and the fact that the Audi instructions tell you to do it that way, which must mean it's ok.
I don't know the exact reason, but let me try and make an educated guess as to why it doesn't cause conflict.
The gear shifter in your car is just an electronic switch, even though it physically moves, it doesn't link mechanically to anything. Therefore, I assume if the gearbox was manually put in the 'wrong position' to what was shown on the shifter, after turning on the ignition the switch would override that position and just move the gearbox to whatever position the shifter was in.
Another reason is that I'm pretty sure neutral and park are the exact same 'state' for the gearbox, the difference will be that park engages the parking brake and may also 'lock' the gearbox so that the car wouldn't move even if the brakes failed. You'll note the selector forks have no park position, backing this theory up.
Hope this helps and glad you liked the guide!
Cheers,
Andy.
Hi Andy. Excellent write up, thanks for taking the time to document this for other people. Would the mechatronic unit failing cause the car to lurch forward when going into first gear(when initially selecting D and stopping for traffic)? The car also occasionally stalls due to this. I took the car to a garage to have the basic settings done for the clutches and this appears to have improved it slightly but I'm not sure how long this is likely to last. Unfortunately I don't get any error messages on the dash so it makes it slightly more difficult to diagnose. How did you car hold up after doing this repair?
ReplyDeleteHi there,
DeleteThanks for taking the time to leave a nice message, glad you found the article useful :)
In respect of the car lurching, I don't recall mine doing it and I'm not sure if it would as a result of mechatronic failure, there doesn't appear to be any mention of it in the technical service bulletin either.
I recall my car sort of clunking into first and reverse gear but don't recall any physical movement of the car as a result, it didn't stall or almost stall either.
I'd be hesitant to undertake this fix without some of the warning messages popping up, it's quite an involved job and expensive, you want to be 80%+ sure it's the problem.
I'm sure you have, but double check the fault codes to see if something has flagged in the background without showing any error messages on the dash.
As for my car, it's been fine since I did the work touch wood! (I did it in Nov 2019).
Apologies I can't be a bit more conclusive for you, but hopefully I've helped a little!
Thanks,
Andy.
Thanks Andy, really appreciate you coming back to me and it's a great help. I couldn't see any error messages when I checked so I took to a garage and they said there wasn't any either. I have contacted a couple of companies about it but most are saying to essentially throw a load of parts at it (@£2300+vat) and hope it fixes the issue. I don't really fancy doing that for obvious reasons though. I think it might be best to continue driving for now and hope something comes up in a scan at some point.
ReplyDeleteHey, great description, very accurate with removal and mounting to a place where no one showed it on YouTube and does not discuss, only show dismantled or mounted do not describe how to set it to enter the place super described. I have one question because I will change the clutch valves k1 and k2 and the smaller ones, do you know how much force to tighten nm? all 4 the two big and the small one it would be great because nowhere I can find thanks
ReplyDeleteHi there,
DeleteSorry if this is a little too late for you, but unfortunately I can't find the torque value either. The torque values for all the stuff I swapped in this guide were very low, so I would be careful not to over tighten if you go for it.
I'd probably call Audi directly though, and ask one of their tech guys to look on the system and let you know.
If you do find it out it'd be great if you copy it here so hopefully people in future could benefit.
Thanks for the comment,
Andy.
Awesome post you have here Andy. I just used your info working on a 2013 A7 with the error message " Gearbox fault: You can continue driving to a limited extent only no reverse gears".
ReplyDeleteInitial diagnosis had the P174C error code with no reverse gears, so I ordered the mech repair kits with the PCB and 3 solenoid switches. Installed and I no longer have that error message with reverse drive now available but I now have another issue.
Further diagnosis revealed P17D4 00 and car no longer have the odd gears 1,3,5 and 7 with the message " Gearbox fault: You can continue driving to limited extent only".
So where do you feel I could have gone wrong ��.
Cheers!
Jyde
Hi Jyde,
DeleteFirstly, thanks for the comment :)
Second, it sucks you've still got a problem after going to the trouble of fitting the mechatronic and solenoid repair kit!
Providing you installed everything correctly, I don't think you've gone wrong. It could be that fixing one issue has exposed another...
Have a read of this forum thread: DSG Throwing Code 8955 P17D4 - Valve 3 in Transmission Part 1
As you've replaced the solenoids as well, you could have a problem with the wet clutches?
I would definitely get the car inspected by either Audi or a very experienced independent mechanic, unfortunately I have reached the limit of my knowledge to try and help :(
Fingers crossed you manage to resolve your problem, let us know what the issue is if you solve it!
Hope this helps,
Andy.
Do you think that this kit can solve the fault p173f00, valve 2 in box 1? Thank you
ReplyDeleteHi Tony,
DeleteIt certainly seems like your fault code is associated with the Mechatronics unit rather than the driving mode sensor module (the other common fault).
Check out this page from ECU Testing, they show your error code as being to do with the parts I replace in this guide.
I don't want to say 100% as I'm by no means an expert, and I wouldn't want you to spend £££ and me be wrong. I'd have a chat with ECU Testing, or some other professional service and try to be as sure as possible before diving in.
Hope this helps and good luck getting your car repaired!
Andy.
Hi Tony. Have you managed to fix your problem. I have the exact same error code on my audi a7 and my mechanics recommended to replace the mechatronic for £4300. I found a source saying that transmission control unit replacement should do as it's an electronic issue. Not sure what to do.
DeleteHi Andy,
ReplyDeleteThank you so much for this, it is really excellent!!!
Cheers,
William
No worries William, hope it helps!
DeleteThanks for taking the time to leave a comment, I really appreciate it :)
Cheers,
Andy.
Excellent write up! I'm printing this out for me :)
ReplyDeleteI've got a 2010 Audi A5 2.0T with the famous "gearbox malfunction - no reverse gear" the error code on mine P174F00 - "valve 4 in partial transmission2"
I was thinking of doing the mechatronic repair done but can't find the right part for my car. I see a lot of mechatronic repair kits with different part numbers. Many websites provides parts for S5 but says it does not fit an A5? Is that the case? Would you know what the difference between these units are on different cars?
Regards
Great review and super detailed.
ReplyDeleteI'm having issues with my A5 3.0 TDi Cab which at the moment has no lights on the dash, only a juddering going from 2nd to 1st and to a halt and a mechanical chuntering sound in reverse with a judder. It had an transmission oil change at Audi in October and that didnt improve it. Its been back to Audi and basically they have no idea. Although they've stated no codes, no swarf in gearbox oil and oil not burnt. 2 Independents have said its either the K1 clutch or the other reckons it needs the wiring harness in the Mechatronics replaced. Either way its expensive but i don't really want to take the cannon fire approach to fixing it. Car is 2011 with 90K on the clock. Had three DSG oil changes in its life. Drives fine with no clutch slip or horrifics bangs into gear. Any thoughts? :-(
Hello Andy wayne here well said iv done all you recommend and iv developed another issue vehicle stalls moment u put in gear seems something iv done is up to no good
ReplyDeletecan you possibly shed some light on what i may have done wrong
regards wayne .
Hy. I bought the repair kit for my car(with the solenoids). It's an Audi A7, but the transmission is the same. Well, most of your experience and guidance is helped a lot. But as it is an A7, i faced with some minor differents. I had to lift the unit like 3-4 times to get it into place, because serial number or whatever it is said i have to adjust the hanger things to 28mm, but at the end i adjusted to 32mm to be able to put everything back together. Other than that, the job is doable. I went into a diy garage here in Germany. I paid for the parts like 800 eur, it's approx 670 GBP and 70 eur for the lift and for the waste oil and filters to recycle it.(or whatever). A workshop will easily ask up to 2000-2500 eur for this job. As i didby myself it cost me like 870 eur. Way better price. I hope everything is understandable, as english is not my main language. :D :D Thanks once again, Be safe and healty.
ReplyDeleteBtw. I did everything within 5 hours, from start to finish. (Cleaning the mess what i did also included in 5 hrs.)
DeleteHi Tamás,
DeleteAwesome effort! You made good time doing it in 5 hours and a very nice saving as well.
Thanks for feeding back about the A7 actuators being set slightly differently to the S5, I'll update the main post to warn others too.
Don't worry your English is sehr gut ;-)
Thanks,
Andy.
Did you need to run basic settings like clutch adaption and all that stuff after you did this?
ReplyDeleteHi there,
DeleteIt was a few years ago now I did this job, but I'm pretty sure I didn't reset any adaptations, the car ran fine after so assume it was ok not to. Worth double checking with Audi or a specialist just in case though!
Cheers,
Andy.
Hey Andy, amazing write up and DIY with sharing experience. Just to add to previous comment as adaptation could prolong the life of tranny or otherwise can minimize possible failure rate post mechatronic replacement.
ReplyDeleteAlso on your last photo of what was replaced, you did forgot to add ATF filter as it was replaced too....just kidding :))
Hello Andy
ReplyDeleteCan you please help me with this error P17E1 00
I wold like to know what is and buy it for my client
Is a Audi A6 2011-2012 3.0 TDI Quattro
First, let me say a massive thanks to you Andy for posting this guide, it’s a fantastic resource for anyone wishing to undertake quite a daunting DIY task.
ReplyDeleteFWIW, anyone thinking of attempting this, it IS doable on your own, and on axle stands but it is hard work! If you can get a mate and ideally a lift or method of ‘safely’ raising the car as high as possible, do it, it will be soooo much easier.
My issue was slightly different (fault 8955/P17D4) and on an A7 but this guide was superb in its depth and detail.
From my experience, I’ll add a couple of things… I used 3 pieces of threaded M6 bar like cylinder block studs to lower the mech safely and help find the position for relocation. I used 130mm length but whatever works in the space you have. Remove 3 of the original screws, screw these in with nuts just below the unit, remove the other 3 screws and then you can lower at your own speed by loosening the nuts down the bars. Much more controlled managing the weight of the mech unit.
More studs may help even more but it’s all I had.
Also, Andy mentions keeping the paper filter dry, keep it in the bag until the last minute! It will draw humidity from the air and still swell, even without direct moisture contact.
Disassembly for me was pretty straightforward, reassembly was hard work, particularly getting the mech unit located. Give yourself plenty of time and be prepared to step away on occasion, it’s frustrating but I’ve just found out, achievable!
And work safe, the A7 is a beast but any car will do serious damage to you and itself if it takes a tumble. Good luck!
And thanks again andybuck!
Andy, Thank you, thank you thank you! Sorry for long comment but I hope someone will find it useful and save years of hassle and great expense. I own a 2011 Audi Q5 3.0 tdi with the 7 Speed S tronic Gearbox. I have owned the car for 8 years and bought it with Full Audi Service History. I am a competent DIY mechanic and have worked on all of my own and family's cars for 30 years and have owned VAG group cars for 20. I have VCDS which I am competent but not expert. From 2 weeks of owning the car I have had transmission issues, lumpy gear changes, lag when pulling away, jumping gears when coming to a stop to a point that it is so severe that occasionally it stalls, very occasional Gearbox malfunction messages on the dash. I have never had a fault logged in the TCM when connected to VCDS. I have taken it to local (Plymouth) AUDI Main Dealer and paid them to do gearbox diagnostics with no fault found and the recommendation to replace transmission. In 2020, I had local " Gearbox specialist!" remove mechatronic unit (cost £500) to send it to ECU testing.com who found a fault on the mechatronic unit and charged £500 to repair with no guarantee that it would solve the issues I was having; and it didn't. I have spent countless hours researching on various audi/vw owners forums and never got to the bottom of my problem. This weekend, having read your relevant vlogs, I decided to have another go myself and have fixed the problem for the cost of a transmission fluid change and a few hours laying under the car. Firstly can I please highlight a possible issue with your thread that you wouldn't be aware of... At step 11, you point to 2 types of external filter and indicate item 8 and item 2 on the diagram. your car had the item 8 type, a replaceable paper filter element so that's what you described. Item 2 is not a filter, I know because I took it off and stripped it. It is in fact a connection manifold. The filter is actually item 5, which is a welded cylinder filter that sits up behind the transmission mount cover. I still need to find the part number for item 5 because I haven't replaced it yet but back-flushed it as a temporary fix. What has fixed my issue is actually following the correct process for filling the ATF and making sure that the final step is carried out with the ATF temp at 40 degrees C and then doing the basic function adaptations (setup) on VCDS. For info I drained out 5 litres and used 6.5 litres on refill. The result is that my car is driving better than it ever has. Every gear change crisp with seamless power, instantaneous response when pulling away from stop, no clunking or juddering. My conclusions: 1) my transmission has been under-charged for years. 2) Audi diagnosticians aren't necessarily technicians or experts and will only do what their computer tells them to. 3) Local Gearbox specialists might not follow the manufacturer routine for refilling your gearbox, they might just refill with same amount they take out or worse just put back in what came out. I will now find the part number for sealed filter (item 5) and replace that and keep an eye on it. Once again thanks for your series of vlogs and taking the time to read my comment. Mike (CEng/Part time DIY Car Guy)
ReplyDeleteSorry that I wrote my post without line breaks. I know it makes it difficult to read. Please feel free to chop up. PS I also had to replace the high pressure fuel pump a few years ago after a catastrophic failure on the Motorway. due to water ingress caused by the poorly designed fuel filler cap and draining design. The total job was DIY doable with some careful flushing and filtering of the fuel system...AUDI proposed repair...replace every component on the fuel system cost circa £5K! do you have a thread I can add to?
DeleteThanks very much for putting this guide together, I was able to complete my repair by following the steps.
ReplyDeletehey hope you are well I followed your guide it was great help removal and install was easy because of your guide however after fitting the mech unit back in I have no start and the gear is stuck in p with a park brake malfunction have you heard of this issue or come across it yourself?
ReplyDeletePost a Comment
Let me know what you think by leaving a comment below.