Whether you're looking to replace like for like, or wanting to upgrade your B8 Audi S4 / S5's front discs and pads, I've got you covered!
Keep reading for exclusive Audi UK main dealer discounts too (up to 18% off!)

This post may contain affiliate links. Please read my disclosure for more info.
Contents
I'd love it if you read the whole article, but if you're in a hurry, jump to the relevant section using the quick links below.
- 1.0 - Tools Required
- 2.0 - Parts Required
- 3.0 - How to Replace B8 Audi S5 Front Brake Discs and Pads
- 4.0 - How to Correctly Bed in New Brake Pads
If you find this article useful, it'd be amazing if you could help me spread the word by sharing it on social media or your favourite forum, thanks!
1.0 - Tools Required

Thankfully, changing your discs and pads doesn't require much in the way of special tools.
-
Socket Set
-
13mm
21mm
Torx Bit T30
-
13mm
-
Breaker Bar
- For wheel and caliper carrier bolts.
-
Impact Wrench
- Optional, but would make things way quicker / easier.
-
Torque Wrench
- Capable of torque ranges from 20Nm to 196Nm.
-
Jack / Axle Stands / Wheel Chocks
- Never rely solely on a jack, they can and do fail, always ensure you're working safely.
-
Brake Piston Spreader T10145 or G Clamp
- You can pick up much more reasonably priced piston spreaders, like this one on Amazon.
- Brake Cleaner
-
Strong Wire / String
- To hang/support the caliper, half a metre should be plenty.
-
PPE
- Working on brakes is a messy job, definitely worth getting yourself some nitrile gloves, I really rate Black Mamba's, been using them for years now.
Make sure you've got a P3 face mask too, brake dust and brake cleaner are not nice things to be breathing in.
- Working on brakes is a messy job, definitely worth getting yourself some nitrile gloves, I really rate Black Mamba's, been using them for years now.
-
Wire Brush / Rags
- To clean up the hub and carrier.
2.0 - Parts Required

For the purpose of this article, I'll list all the parts you might want to change, you can choose which bits you actually change to suit your needs.
Note: The part numbers are correct for my 2010 B8 S5 Sportback, please double check the parts fit your vehicle.
- Brake Pads
- Brake Discs / Rotors
- Wear Sensor - 8K0 615 121
- Brake Caliper Carrier Bolts - N91147601
- (4 per axle) - Audi states to replace these bolts after removing the carrier, I didn't and my car's been fine, but there's no saying yours would be the same, use your own judgement.
- Retaining Spring - 8K0 615 269 A
- (2 per axle) - This one's optional, no need to replace them, just here in case you lose one.
If you're just replacing pads or discs, just make sure the surface of whichever you're not replacing is good and won't cause uneven wear, or poor contact.
For example, if you replace your pads but the disc is unevenly warn (grooved / scored / crowned), you may not get full engagement of the pad.
2.1 - Audi UK Discount

I've teamed up with Crewe Audi to provide you guys with exclusive discounts on genuine Audi parts (up to 18% off!)
So, if you want to fit genuine Audi parts, but don't want to pay main dealer labour costs, contact Tom Fox @ Crewe Audi for the latest prices and mention you found his contact info on AndyBuck's S5 Build Blog.
2.2 - Brake Pad and Disc Size + Wear Limits
It's important to know when to replace your S4 / S5's pads and discs, you don't want to unnecessarily change them early (unless you enjoy hemorrhaging money) and you definitely don't want to risk leaving it too late.
To ensure you change components at the right time, you need to know and check that the pads and discs aren't below the minimum thicknesses (wear limit).
I've put together the following handy table to save you some time searching them out, I've also included a few other helpful things like disc size (note, these numbers are for the B8 / B8.5 S4 and S5 only):
| Part | Specification | Measurement (mm) |
|---|---|---|
| Brake Disc (Ventilated) |
Diameter | 345 |
| Thickness | 30 | |
| Minimum Thickness (Wear Limit) |
28 | |
| Brake Pad (inc. back-plate + damper plate) |
Thickness | 20.3 |
| Minimum Thickness (Wear Limit) |
10 |
2.3 - Best Audi S4 / S5 Front Brake Pads
Everyone's brake pad needs are different, so there isn't a one size fits all solution.
Typically though, most people's needs fit into one of these categories;
- Genuine Audi Brake Pads - For the 'original is best' mindset
- OEM Quality - e.g. Pagid, EBC Ultimax2
- Low Dust Ceramic - Helps prevent your wheels getting so dirty e.g. EBC Redstuff
- Fast Road / Track Day - e.g. EBC Yellowstuff/Bluestuff
Genuine Audi Brake Pads
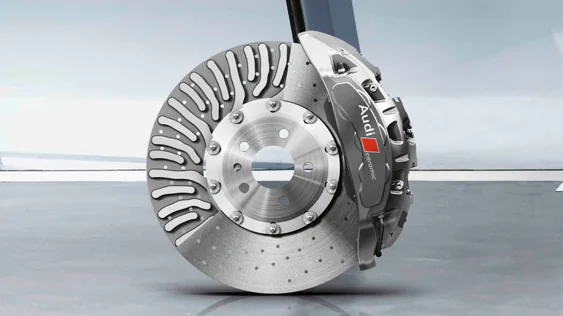
The beauty of genuine parts is you know they have been tested to the n'th degree and will perform just how the engineers designed them to, with brakes that's pretty reassuring.
You may also want to use genuine Audi parts to ensure you don't void the terms of a warranty.
To give you an idea of the cost, for my S5 Tom Fox @ Crewe Audi quoted:
Genuine B8 Audi S4 / S5 front brake pads are £154.10 RRP (axle set), the discounted price is £126.00 (these have a built in pad wear sensor).
Audi do also recommend using a VAG "assembly paste", part number: G052560A2, which is £45.17.
If you're not up for getting your hands dirty at all, Audi also offer some fixed price services.
To have my S5's front brake pads replaced it'd cost £255 (at the time of writing).
OEM Quality Brake Pads

I expect most people will fall into this category.
All car manufacturers charge a premium for their genuine parts for a number of reasons, the most important to the customer is the sense of security that the brake pads will fit and will perform how they should.
In reality though, aftermarket pads will perform just as well (providing you go for a reputable manufacturer like Pagid, Bosch or ATE). These reputable manufacturers are usually the supplier of the genuine Audi part anyway.
On carparts4less, a set of B8 Audi S5 Pagid front brake pads will set you back £67.58 (at the time of writing, and without using a discount code).
Low Dust Ceramic Brake Pads

This is my favourite category, OEM quality stopping power (or better) with less dust, meaning your wheels stay cleaner for longer. They are usually more expensive than OEM quality pads though.
EBC Redstuff are my brake pads of choice for my S5 (part number: DP31986C), you can see me fitting them in the how-to guide below. They are currently retailing at £110-140 for the front axle (no wear sensor included).
Combine low dust brake pads with a decent wheel sealant (like Poorboy's) or a ceramic coating (like Gtechniq C5) and your alloys will be looking 'just washed' for weeks.

Fast Road / Track Day Brake Pads

I'm not going to profess to know anything about track day brake pads, I've never used them and couldn't comment on which is best.
However, one word of warning on the subject, brake pads have to pass certain tests and regulations to be road legal, some pads may not pass the cold stop requirements in your country (in the EU it's ECE R90).
According to EBC's website, their new Yellowstuff pads pass this requirement, whereas the older ones didn't.
Double check when purchasing to save any hassle.
2.4 - Best Audi S5 Front Brake Discs / Rotors
Much the same as brake pads, everyone's brake disc needs are slightly different.
Again though, there are a few standard categories:
- Genuine Audi Brake Discs - (for the 'original is best' mindset)
- OEM Quality Brake Discs - e.g. Pagid, EBC Premium
- Performance Brake Discs - e.g. EBC's USR, GD Sport and BSD Rotors
Genuine Audi Brake Discs / Rotors

As with the pads, I got a quote from Tom Fox @ Crewe Audi:
Genuine B8 Audi S4 / S5 front brake discs are £304.37 RRP, the discounted price is £265.00.
Similarly to the brake pads, Audi offer a fixed price service to replace brake discs, unfortunately though, you have to have the pads done at the same time.
At the time of writing, the cost for Audi to replace my S5's front discs and pads is £655. (Ouch!)
Doing some quick maths, if Audi's fixed price pad replacement is £255, replacing the discs adds an extra £400.
OEM Quality Brake Discs / Rotors

For most people, this will be the best option.
The same quality as Audi's genuine parts, at a fraction of the cost.
I'd recommend sticking with a reputable brand like Pagid, EBC, ATE, Brembo, and avoiding the ebay specials.
To give you some idea of cost, on carparts4less you can pick up a pair of Pagid front discs for £138.60 (using a discount code I got this down to £113.66).
Performance Brake Discs / Rotors

If you want to improve your car's aesthetic and performance, you'll want some performance discs.
Standard solid discs are pretty dull looking, adding grooves, dimples or cross drilled holes gives the wheel area a huge visual lift in my opinion. Hence why I fitted EBC USR1571 grooved discs to my S5.
So, what are the advantages of grooves, dimples and cross drilled holes in brake discs?
Well, they aren't just there to look good, they actually serve several purposes:
- Increase friction
- Grooves, dimples and cross drilled holes make the braking surface of the disc less constant, increasing the friction coefficient.
- Remove hot gases
- During braking, the resins used to manufacture brake pads combust, this produces hot gases which can reduce the friction between the pad and disc, a bit like how an air hockey puck 'floats'. Grooves and cross drilled holes allow these hot gases to escape. Meaning the disc and pad maintain constant contact and a cooler more consistent temperature compared to a solid disc. Cross drilled holes are the most efficient at this.
- Remove water
- Much the same as the hot gases, water can build up a film over the disc, reducing friction. Grooves will expel the water and cross drilled holes will disrupt the film.
- Clean the pad surface
- The edges of the holes, grooves and dimples scrape the pad surface clean when braking, removing old pad material and any ferrous contaminent left by the disc. This ensures the brake pad surface is 'new' and has full bite each time you apply the brake.
2.5 - Tightening Torque Values
Note: the following torque values are for the 1LA / 1LB / 1LJ / 1LD / 1ZT / S4 / S5 brakes ONLY.
Please double check the values for your specific vehicle.

| No. | Part Name | Tightening Torque |
|---|---|---|
| 3 | Brake Carrier Bolt | 196 Nm |
| 4 | Brake Caliper Guide Pin | 30 Nm |
| 5 | Brake Line Connection | 20 Nm |
| 12 | Brake Disc Bolt | 5 Nm |
| - | Brake Bleed Screw | 14 Nm |
3.0 - How to Replace B8 Audi S5 Front Brake Discs and Pads
Disclaimer: Any information given in this guide is to be used at the readers own risk. I take no responsibility for injuries to the reader or damage to their vehicles. If this guide is followed correctly, no harm should occur to either the reader or the car.
Please read through the entirety of this guide prior to undertaking any work, and take due care.
All images used in this guide are of my B8 2010 Audi S5 Sportback, the process should be identical on the S5 Coupe, S5 Cabriolet/Convertible and the S4.
Step 1 - Pop the Bonnet and Unscrew Brake Fluid Reservoir Cap
Don't forget this step.
I forgot on a family member's car and rather embarressingly remembered after 20mins of trying to wind the piston back...

You don't need to fully remove the cap, just leave it resting on the reservoir to stop any debris falling in.

It's also worth wrapping a rag around the cap of the reservoir to catch any brake fluid that might spill over when you push the piston back later.
Step 2 - Jack Your Vehicle Up
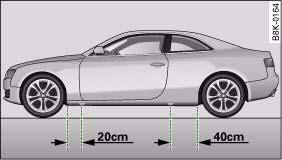
You don't have to have all four corners off the ground and level for this job, just the one you're working on if that's all you have room/equipment for.
If you're only doing one corner, chock the other wheels and make sure you're not just relying on the jack, use an axle stand as a fail safe.
Step 3 - Remove the Wheel
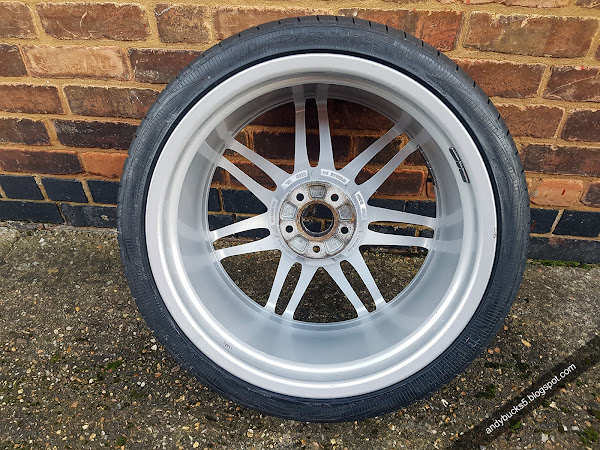
Not much explanation required here.As you're removing the wheel, it's a good opportunity to inspect the tyre for uneven wear, I had bizzare uneven wear running Vredestein Ultrac Vorti's, they were almost bald on the inside edge but only 1/2 the way around?!

It's also a great chance to thoroughly clean the inside of the alloy, get to all those bits you can't quite reach with the wheels on.
Step 4 - Disconnect Brake Pad Wear Sensor
This step only applies to the front left hand side of the vehicle (there isn't a sensor on the right hand side).The Audi workshop manual tells you to disconnect the wear sensor from the wiring harness first, but I find it a bit easier to unclip the connector from the bracket, then disconnect the wear sensor.
So, either get your nail under the connector tab (red arrow) to lift the tab out of the slot, or poke a flat head screwdriver through the slot in the bracket and push the tab out of the slot.


Then rotate the connector 90° clockwise like so.

The connector should then just slide out downward from the bracket.

To disconnect the wear sensor from the wiring harness, depress the tab (red arrow) on the wiring harness side, then pull the connectors apart.


Finally, the sensor just pulls out of the brake pad.
Step 5 - Remove the Anti Rattle Spring Clip
Wear eye protection for this step if nothing else.According to Audi, you are supposed to use a flat head screwdriver to press the centre tab of the spring to remove the brake pad anti rattle spring clip.
From memory, I struggled with this and just levered off one of the arms instead.
Take care when doing this step, these springs are under high tension, place your other hand over the spring to stop it flying off.
If you have a painted caliper, like on the S4 / S5, you may also wish to wrap a cloth around the screwdriver to avoid scratching the paint, or use a plastic trim puller.

Once removed, your brakes will look like this.
Step 6 - Remove Caliper Guide Pins
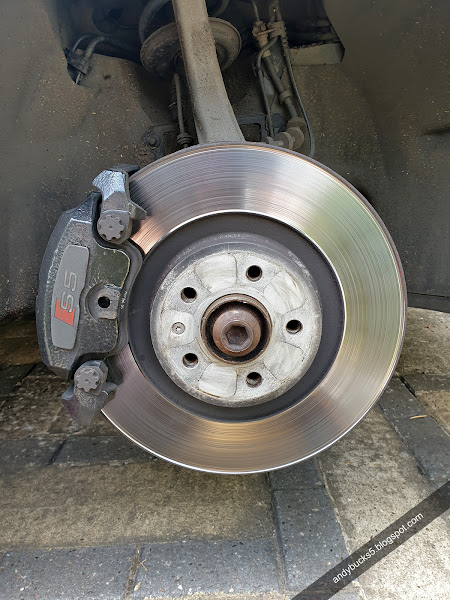
Using the 13mm socket, remove the caliper guide pins.(Have your wire / string ready at this point to hang the caliper from, just in case it's loose).

Step 7 - Support the Caliper
Using your wire / string, hang the caliper from the suspension, making sure that the wire is taking the weight, not the brake line.Make sure the brake line isn't in an awkward position and isn't kinked.

Step 8 - Remove the Brake Pads
With the caliper removed, you should be able to just push/pull the brake pads out (the side without the clip may have fell out already).Step 9 - Reset the Piston
Have a trusty sidekick on hand for this bit if you can, get them to keep an eye on the brake fluid level as you push the piston back.If it looks like it's going to overflow, syringe some out.
If you've got one, use a piston spreader (VAG Tool T10145) to push the piston back.

Alternatively you could use a G clamp like I did. Whichever method you use, be sure not to damage the rubber seal around the piston.
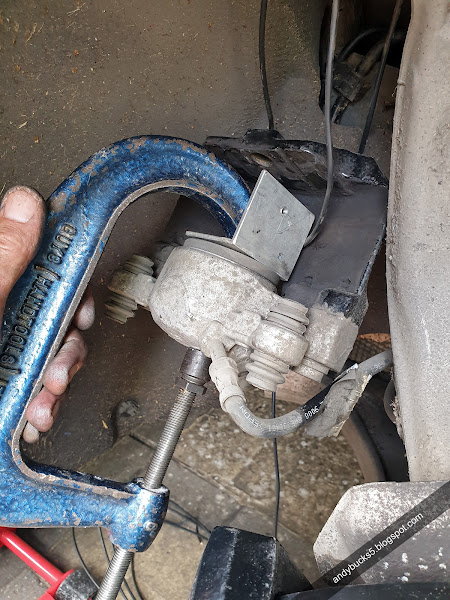
If you're only replacing your brake pads, skip to Step 15.
Step 10 - Remove the Caliper Carrier
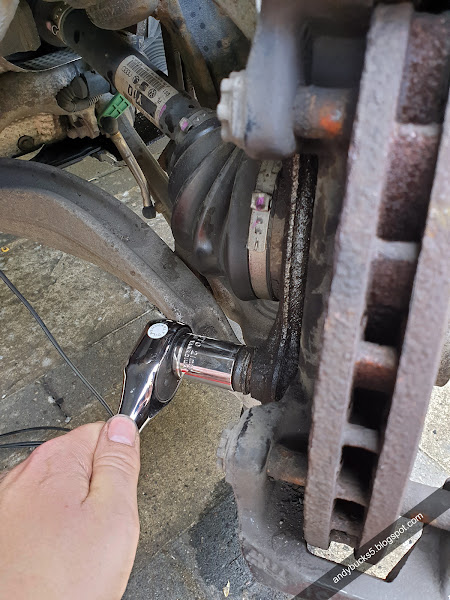
Using the 21mm socket and your breaker bar, undo both caliper carrier bolts and remove them.You can see in the photo below that I've turned the steering to get better access to the bolts, also so I could get my breaker bar on inside the wheelarch.
These bolts are tight, if you've got an impact wrench this is definitely a job worth using it on.
Step 11 - Remove the Disc
Using the Torx T30 bit, undo the disc retaining bolt.
If you're lucky, the disc will be loose on the hub, if not, use a rubber mallet to give the disc a love tap from the back. Tap it at opposite sides so it comes off the hub straight, not at an angle.
Step 12 - Clean the Hub and Carrier Pad Retaining Pins
It's good practice to clean up the hub surface, use a bit of wire wool or light sand paper to clear off the worst of any surface rust.Give the highlighted pad retaining pins on the carrier a clean too, just use a rag / cloth and some brake cleaner.

Step 13 - Fit New Disc
Drilled, dimpled and grooved discs are directional / handed, double check you have the correct disc for the side of the car you're working on.
Don't do what I did and fit the wrong side only to realise when you've got the whole assembly back together...
Use the Torx T30 bit to tighten the disc retaining bolt to a torque of 5Nm.
Step 14 - Refit Caliper Carrier
Using your new carrier bolts, refit the caliper carrier.
Start tightening both bolts by hand to ensure the carrier is in the correct position.
Alternate tightening both bolts with your torque wrench until tight (but not to the specified torque) to ensure the carrier is seated correctly.
Then set the torque wrench to 196Nm.
Step 15 - Fit New Brake Pads
Whilst the caliper is still being supported by the wire, push the brake pad with the spring clip on the back into place in the caliper first.The spring fits inside the piston.

Next, slot the outer brake pad into the caliper, ensure the locating boss (yellow arrows below) on the backplate of the pad is seated correctly in the caliper.

Step 16 - Refit Brake Caliper
Untie the brake caliper and carefully slide it over the disc and back into place.You may have to try and hold the outer pad in place until the pad is part way onto the disc.
If you are struggling to refit the caliper, you may not have pressed the piston out far enough.
Slide both the caliper guide pin bolts back in then tighten them alternately until fairly tight.
Finally, torque them to 30Nm.
Step 17 - Refit Anti Rattle Spring Clip
Refitting the anti rattle spring clip can be an absolute pain in the @$$.If you're really struggling, check out this tip from SST, I've not tried it myself, but seems legit.
Once it's on, your brake set up should look like this:

Step 18 - Fit New Wear Sensor
Again, this only applies to the front left hand corner.The sensor should just push into the new pad.

However, I had trouble with the EBC sensor not fitting into the EBC RedStuff pad, it snapped in the end so I had to order a replacement sensor.
I plumped for a Pagid one which fit perfectly.
Reconnecting the sensor to the wiring harness is simples, just do the opposite of Step 4, clip the new wear sensor connector into the wiring harness til it clicks, slide the connectors back into the bracket, and turn it 90° so the tab fits into the slot. Done.
Step 19 - Refit Wheels
If you're running wheel spacers, refit them then refit your wheel.
If you'd like to learn more about fitting wheel spacers to your S4 / S5, check out my complete guide to wheel spacers.
Don't fully torque your wheel bolts until the car is on the ground, just do them tight for now.
Step 20 - Lower the Car Down and Torque Wheel Bolts
Safely jack the car down, removing the axle stand and making sure all tools are out of the way.Once the car is supporting it's full weight, torque the wheel bolts to 120Nm.
You're done!
Make sure you read how to correctly bed the brakes in below.

4.0 - How to Correctly Bed in New Brake Pads
It goes without saying that this procedure should only be undertaken in a safe environment.
Use common sense to pick an appropriate time and a place to carry out the final bed-in process.
- Resist the temptation to go out and hammer your new brake set up to see how it performs, you need to drive it steady for 200miles.
- Use the brakes gently for the first 200miles, you should only brake severely in an emergency.
- After 200 miles of gentle use, decelerate from 60mph to 20mph at least 5 times to complete the bed-in process.
Conclusion
You should be all set to swap out your S5's front brake discs and pads, but if you still have some unanswered questions put them in the comments below!
Be sure to check out my other service guides for your S5 too.
I really hope you enjoyed this article and found it useful, if you did, I'd really appreciate it if you'd share it on social media or your favourite forum, it'd really help me out and enable me to create more how-to guides like this.
Be sure to Like, Subscribe and Follow me on your favourite social media platforms at the following links: Facebook, Instagram and YouTube, search andybuck123.
Stay tuned for plenty more content to come!

1 Comments
1st class article
ReplyDeletePost a Comment
Let me know what you think by leaving a comment below.