Don't panic just yet, the culprit might be a faulty MAP sensor, which is a cheap and simple DIY fix!

This post may contain affiliate links. Please read my disclosure for more info.
Contents
In this article I explain everything you need to know about MAP sensors; what they are, where to find them, symptoms of a faulty MAP sensor and how to clean or replace them.
A lot of the information applies to all vehicles no matter the brand or engine, however, a few sections are specific to the Audi 3.0L V6T engine found in the B8 and B8.5 Audi S4 and S5. All the images used are from my B8 S5 Sportback (engine code CAKA).
Although the engine bay layout might be subtly different, a lot of this article will apply directly to the A7 and SQ5's fitted with the V6 TFSI too.
If you're looking for one specific bit of info, just click on the relevant section of the contents list and you'll jump right to it.
- 1.0 - What does MAP stand for?
- 2.0 - What does the MAP Sensor Do?
- 3.0 - Audi S5 MAP Sensor Locations
- 4.0 - Symptoms of a Faulty MAP Sensor
- 5.0 - How to Remove and Replace Audi S5 MAP Sensors
- 5.1 - How to Remove and Replace the Supercharger MAP Sensors (038906051J)
- 5.2 - How to Remove and Replace the Throttle Body MAP Sensor (03C906051F)
- 6.0 - How to Clean the MAP Sensors
If you find this article useful, I'd really appreciate it if you could help me spread the word by sharing it on social media or your favourite forum, thanks!
1.0 - What does MAP stand for?
MAP stands for Manifold Absolute Pressure.
1.1 - MAP Sensor a.k.a...
Rather confusingly, the Manifold Absolute Pressure (MAP) sensor is called a multitude of different names, they all refer to the same thing though. Keeps you on your toes I guess...
You may have seen any of the following terms used:
- Charge Air Pressure Sensor
- Supercharger Air Outlet Pressure Sensor
- Turbo Boost Sensor (yep I know, the V6 isn't turbocharged on the B8/B8.5)
- Turbocharger Boost Sensor
MAP is not to be confused with MAF, I explain the difference between the two sensor types in section 2.1.
2.0 - What does the MAP Sensor Do?
The MAP sensor measures the barometric pressure, i.e. vacuum pressure, inside the intake manifold, which in the case of our V6Ts is the supercharger module.
The MAP sensor sends its measurements to the Engine Control Module (ECM), also referred to as the Engine Control Unit (ECU), in the form of voltage signals.

The ECM uses these measurements (combined with inputs from other sensors) to calculate a number of variables that ensure proper running of the engine:
- charge pressure
- fuel to air mixture
- injection rate
- injection timing
- ignition advance angle
- idle speed
2.1 - MAP vs MAF Sensor
Firstly, the 3.0L V6T does not have a MAF sensor.
In the interest of completeness though, and a chance to geek out for a minute, here's a quick explanation of MAF sensors.
MAF stands for Mass Air Flow.
As you now know, the MAP sensor measures barometric pressure inside the intake manifold. A MAF sensor however, measures air flow in the intake (before reaching the manifold).
Depending on the car and engine variant, the MAF sensor could be positioned at various points along the intake ducting.
There are a number of types of MAF sensor;
- Moving vane
- Hot wire
- Cold wire
- Kármán vortex
- Membrane sensor
- Laminar flow elements
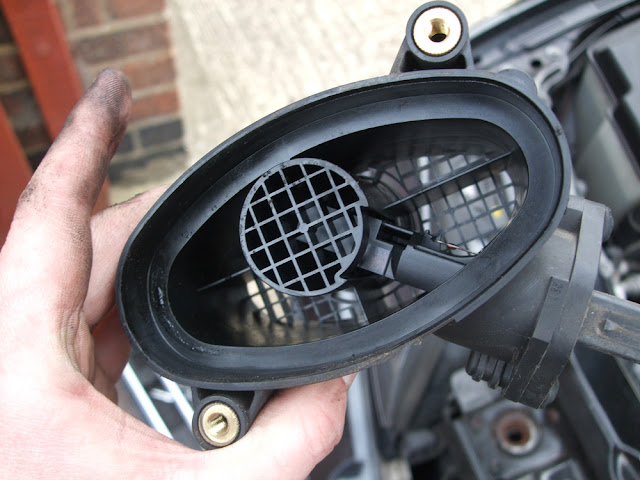
By far the most common type of MAF sensor I've seen used in my cars, is hot wire. For example, this is the MAF sensor from my BMW E46 330d.


Hot wire MAF sensors work by passing a constant voltage through a wire that heats it up (like the heating elements in your toaster). As the wire heats up, the hotter it gets the higher its electrical resistance gets.
The wire sticks out into the intake air flow, the higher the air flow, the more the wire is cooled by that air flow.
As the wire cools, the resistance drops, allowing more current to flow.
It's the current level rises and falls that are measured and sent to the ECM.
Here's a short video from Engineering Explained that goes into a little bit more detail if you're interested.
3.0 - Audi S5 MAP Sensor Locations
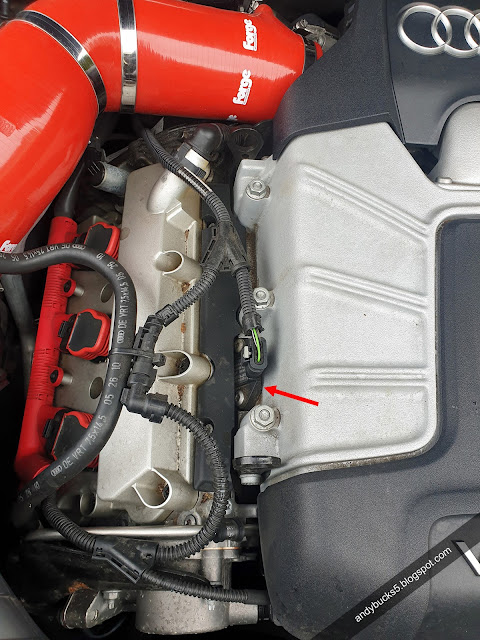
The Audi 3.0L TFSI V6T (3.0T) engine in the B8 and B8.5 S5 has three MAP sensors.
Two identical MAP sensors (038906051J) are located on the left and right hand side of the supercharger, one for each of the two rotors.


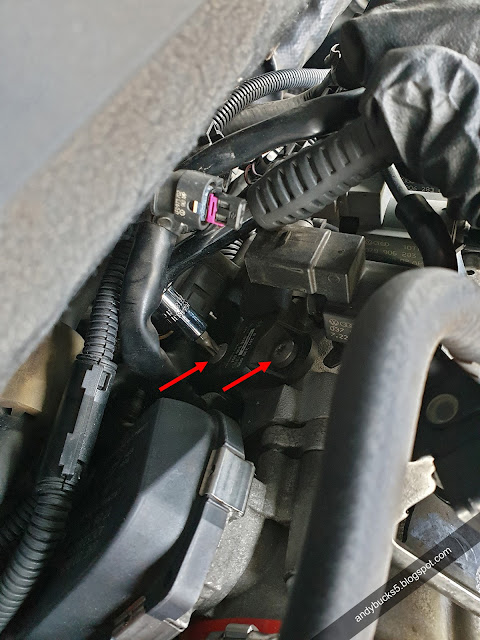
The other MAP sensor (03C906051F, sometimes just 03C906051) is located at the back of the supercharger module, just after air has passed through the butterfly valve of the throttle valve control module (throttle body to you and me).
It's not easy to spot, you have to be stood at the side of the car and lean in.


3.1 - Audi S5 MAP Sensor Part Numbers and Cost
There are two types of MAP sensor used on the 3.0T engine, it's important you get the right one (scroll up to section 3.0 if you aren't sure).
I got in touch with a contact at Audi who quoted £66 delivered for 038906051J. Fortunately, you can pick the exact same part up from Autodoc for 1/3 the price (that's what I did).
*Please double check the part numbers of the sensors on your specific car before ordering a replacement, better safe than sorry.
| Part Number | Fitted Qty | Purchase Link |
|---|---|---|
| 038906051J | 2 | Autodoc |
| 03C906051F | 1 | Autodoc |


4.0 - Symptoms of a Faulty MAP Sensor

Symptoms of a faulty MAP sensor include:
- Stalling
- Rough / lumpy idle
- This could also be a symptom of a dirty throttle body
- Hesitation
- Check Engine Light (CEL) / Malfunction Indicator Lamp (MIL)
- Stored fault codes (P code)
- Poor fuel economy
- Increased emissions
- Reduced performance
- Spark plug fouling
- Catalytic converter failure
- Excessive hydrocarbons in the engine oil causing engine bearing wear
- Inconsistent or harsh gear changes
- This could also be a symptom of a faulty S tronic Mechatronic Unit
There's some pretty worrying symptoms in that list, which is why I recommend cleaning your MAP sensors as part of your yearly service. More on cleaning in section 6.
Meanwhile, let's try and narrow down which of the three MAP sensors is likely to be the issue and get your car back to full health.
When the signal from one of the sensors fails to reach the ECM, the CEL (MIL) is illuminated.
If 03C906051F is at fault, it will mean the ECM isn't able to calculate accurate adjustments of the charge pressure, leading to uneven acceleration.
If either of the 038906051J sensors are at fault it will result in an incorrect fuel/air mix due to an incorrect air mass calculation.
This will lead to the incorrect amount of fuel being injected, causing higher emissions, loss of power and misfiring.
Worst case, if a fault occurs whilst in charging mode (smiles per gallon mode), incorrect charge pressures could cause irreparable damage to the engine.
Fortunately, the boffins at Audi thought of this. After ignition the ECM does a check of the sensors. If they aren't functioning as it would expect, the system switches to an equivalent sensor or the backup sender. The system can then operate normally and avoid damage.
4.1 - VAG Fault Codes Related to a Faulty MAP Sensor
This is not an exhaustive list, there are likely more fault codes that can be thrown up by the MAP sensor, these are just the ones I've had myself or have found whilst trawling the internets:
- P023600 - Turbocharger Boost Sensor (A) Circ. Range/Performance
- P023700 - Turbocharger Boost Sensor (A) Circ. Low Input
- P030000 - Random/Multiple Cylinder Misfire Detected
- P030100 - Cyl.1 Misfire Detected
- P030200 - Cyl.2 Misfire Detected
- P030300 - Cyl.3 Misfire Detected
- P030400 - Cyl.4 Misfire Detected
- P030500 - Cyl.5 Misfire Detected
- P030600 - Cyl.6 Misfire Detected
- P130A00 - Hide cylinder
- P006800 - MAP/MAF - Throttle Position Correlation
- P307A00 - Intake system Air flow too low
- P241400 - 02 Sensor Exhaust Sample Error, Bank 1 Sensor 1
If you can add to this list, it'd be awesome if you could leave me a comment below!
4.2 - OBDeleven
If you don't have a fault code reader, Audi offer a 'Fixed Price' fault code reading service that, at the time of writing, costs £60 for my Audi S5.
Pretty steep if you ask me.
That's why I highly recommend getting yourself an OBDeleven code reader.

I've had my first gen OBDeleven PRO device for over a year now and it's easily saved me in excess of £1000. How? by enabling me to DIY jobs that I would usually require a garage or dealership to carry out, S tronic Mechatronic Unit replacement for one!
You can either get it direct from OBDEleven or from Amazon.
Here's one of their promo vids to show you how it works.
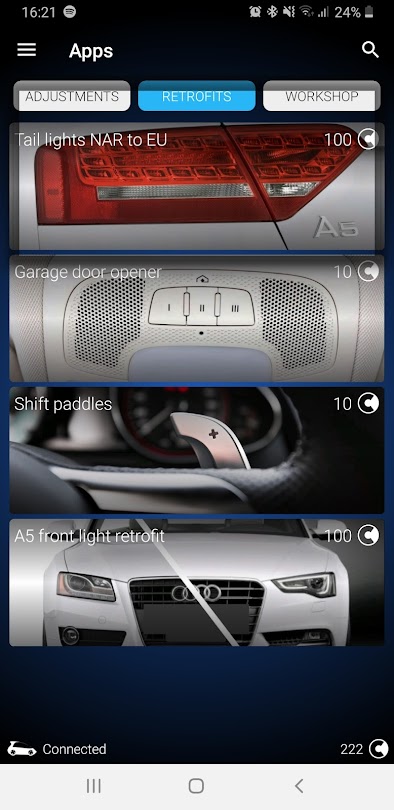
And here's some screenshots I took in App whilst connected to my car, to show you some of the specific things you can do.


5.0 - How to Remove and Replace Audi S5 MAP Sensors
Tools required:
- Torx T25
- Torx T30
- Trim pulling kit
- Narrow flat head screw driver
- Vacuum cleaner (optional)
- Paper towel (optional)
If you don't have a set of Torx bits or drivers, I highly recommend this DeWALT kit, super handy and solid quality you'd expect from DeWALT. I've been using it for my full house renovation too.

Don't worry if your engine bay looks a little different to mine, I've got a TMC chip tuning box fitted, so I have an additional wiring loom you won't have.
I've got a Forge intake hose too.
Neither of these modifications make any difference to the steps below.
5.1 - How to Remove and Replace the Supercharger MAP Sensors (038906051J)
Ok, let's get started with the two MAP sensors on the left and right of the supercharger (038906051J), as they are easiest to access.
Step 1 - Remove Plastic Trim
I show the process with the right hand side (cylinder bank 1-3) in this guide, rest assured it's absolutely identical for the left hand side (cylinder bank 4-6).Using the T25 remove the two bolts holding the black plastic trim in place.


Step 2 - Remove Wiring Harness
Next, remove the wiring harness from the sensor. To do that, slide the light grey tab up about 2-3mm, then squeeze the tab towards the centre of the engine and carefully pull upwards.


Step 3 - Remove MAP Sensor Bolts
Using the T30 now, remove both bolts securing the MAP sensor to the supercharger.
Step 4 - Remove MAP Sensor
Slide a trim puller behind the sensor and very carefully lever the sensor, whilst supporting it with the other hand, to break the seal with the supercharger.Try not to cause the sensor to come out at an angle as it could snap. On my car, once I'd broken the initial seal to the supercharger it came out easy.


Step 5 - Clean
At this point, if you're like me, you'll want to do a bit of tidying up. A lot of debris had collected around my MAP sensor, so I plugged the hole with a paper towel and vacuumed the whole area.
I took the opportunity to clean up the plastic engine trims whilst they were removed too.

If you're starting off by cleaning your sensor before replacing it, skip to section 6.0 now.
If you've done that and you're now replacing your sensor, then carry on with step 6.
Step 6 - Lubricate O Ring
Before fitting your new sensor, wipe a tiny bit of oil on the rubber o ring, just enough to stop it snagging when you press it into the supercharger.
Step 7 - Refit the MAP Sensor
Basically, refitting is just a reversal of steps 1-3 above.Press the MAP sensor back into the supercharger and tighten down the two Torx T30 bolts.
Clip the wiring harness back into place and push the tab down.
Finally, replace the plastic trim and tighten down the two Torx T25 bolts.
5.2 - How to Remove and Replace the Throttle Body MAP Sensor (03C906051F)
Step 1 - Disconnect the Electrical Connector
To gain better access to the MAP sensor, disconnect the electrical connector directly above it (the one nearest the right hand side of the car).
Step 2 - Disconnect the MAP Sensor Wiring Harness
From the right hand side of the car, take your narrow flat head screw driver and poke it gently into the slot in the MAP sensor wiring harness connector.There is a little tab in there you need to lift up (up being car rearward). Make sure your screw driver is the right side of the tab, i.e. the side nearest the front of the car. Lever the tab up, then gingerly push the screw driver toward the left side of the car to pop the connector off.
(Bare with me, taking a photo of this area is tricky. The first image is from when I removed the supercharger so ignore the yellow labels everywhere).


The correct way to remove the connector is by squeezing the tab I've highlighted in the photo below, but you need the hands of a 5 year old child to get to it, and the strength of Eddie Hall to squeeze the clip enough to disengage the tab...

Step 3 - Remove MAP Sensor Bolts
Remove the two Torx T30 bolts securing the MAP sensor.
Step 4 - Remove the MAP Sensor
Getting this MAP sensor out is a little bit more tricky than the supercharger ones, due to hand access. Once the bolts are removed it's only friction holding it in place.Again, make sure you pull the sensor out square, don't pull from one side causing it to come out at an angle, it could cause it to break.

At this point, if you are just cleaning your MAP sensor, skip to section 6.0 now.
If you are replacing your MAP sensor, carry on to step 5.
Step 5 - Lubricate O Ring
Before fitting your new sensor, wipe a tiny bit of oil on the rubber o ring, just enough to stop it snagging when you press it into place.
Step 6 - Refit the MAP Sensor
Basically, refitting is just a reversal of steps 1-3 above.Press the MAP sensor back into place and tighten down the two Torx T30 bolts.
Push the wiring harness connector back into place, make sure it's fully engaged.
Finally, re-attach the connector we disconnected for better hand/tool access, again, make sure it's fully engaged.
6.0 - How to Clean the MAP Sensors
I recommend cleaning your MAP sensors as part of your yearly service to avoid any poor running of your car's engine, prevention is better than cure.
Just take a look how caked up with grime my throttle body MAP sensor is in step 1 below and that's reason enough!
Tools required:
- Electrical Contact Cleaner
- Invertible Air Duster (optional)
- Paper towel / lint free cloth
Step 1 - Remove MAP Sensor
To remove the MAP sensor, follow the steps in section 5.0 for the specific MAP sensor you need to clean.
Step 2 - Spray MAP Sensor Liberally With Contact Cleaner
Spray the MAP sensor liberally with contact cleaner. Make sure you spray from a number of angles at the sensor, so you get the bits behind the outer plastic housing.

Step 3 - Allow MAP Sensor to Fully Dry Out
Make sure the sensor is fully dry before refitting, this is very important. Allow up to an hour just to make sure.To aid the drying process, spray the MAP sensor with the compressed air duster.
I left my sensors to dry propped up on top of some paper towel, so any contact cleaner left after air dusting could drain away.

Step 4 - Refit MAP Sensor
For 038906051J, follow the instructions in section 5.1 starting from Step 6.For 03C906051F, follow the instructions in section 5.2 starting from Step 5.
Wrap Up
Hopefully this article answered all your questions and helped get your Audi back on the road, let me know in the comments if it does!
I really hope you enjoyed this article, if you did I'd really appreciate it if you'd share it on social media or your favourite forum, it'd really help me out.
Be sure to Like, Subscribe and Follow me on your favourite social media platforms at the following links: Facebook, Instagram and YouTube, search andybuck123.
Stay tuned for plenty more content to come!

15 Comments
Great write sir
ReplyDeleteThank you! :)
DeleteFantastic tutorial ! Exactly what I was looking for. Thank you much!
ReplyDeleteThanks dude, glad it helped!
DeleteThank you for the detailed instructions. I pulled mine out and noticed the driver side sensor has a lot of oil on it, but the passenger side one is dry and looks much cleaner. What is possibly causing the oil on the sensor?
ReplyDeleteHi there,
DeleteThanks for the comment :)
Hmm that is odd, you'd expect both to be as dirty as each other. I'm by no means an expert, but I understand these may be causes of oily build ups in the supercharger.
- Bad PCV valve
- Over-oiled air filter
Hopefully someone with more knowledge than me will read your comment and fill you in properly.
Cheers,
Andy
Possibly because the oil cap is right next to the driver side sensor? Oil might’ve accidentally split on/around the sensor and built up over time. Mine was also dirtier on the driver side.
DeleteWhat happens when some c********* stripped out the bottom T30 on the boost pressure sensor
ReplyDeleteextractor or a dremel show
DeleteFantastic tutorial, thanks a bunch! Unfortunately I dropped the MAP sensor T30 screw into the engine bay and after an hour of searching no luck. Anyone know the part number or name for this specific screw or where I could find a replacement? Thanks in advance!
ReplyDeleteI own an Audi 2012 Audi a7 3.0 and I found out that 1 of the sensors are different from the other 2. With that being said the 2 sensors on each side of the engine are the same which are regular map sensors I guess. Then there’s 1 map sensor which that emphasized multiple times that goes in the back of the engine which controls your turbocharger/supercharger for boost response basically. So if your needing to change all three make sure for the sensor in the back part of the engine says boost for turbocharged/supercharged.
ReplyDeleteThe instructions were great, but unfortunately I managed to break the nipple of the passenger side sensor. It was stuck in the hole and when I tried to extract it, it fell into the hole. I obviously need to replace it, but will it cause any damage by not extracting the broken piece? I'm not sure where the hole leads.
ReplyDeleteSame thing just happened to me unfortunately. Were you able to fish it out?
DeleteWell my sensor tip broke off and fell into the supercharger. I can see it when looking into the hole. Any tips on getting it out?
ReplyDeleteDude. Big thanks from across the pond for taking the time to write this up. Do you by any chance know the acceptable/normal range differential between the sensors?
ReplyDeletePost a Comment
Let me know what you think by leaving a comment below.